Whether you’re trying to beat the weekend heat in style or need new pretty but practical styles for warm-weather workdays, these trending updos for summer are everything you’ve been looking for.
We’ve scrolled and scrolled to bring you the best updo hairstyles of the season—alongside simple instructions to create them!
1) The Mid Ponytail

We love high and low ponytails, but this summer we’re all about mid-height ones. This chic yet simple style is the ultimate day-to-night updo, with sleek face-framing pieces at the front, and plenty of volume in the back.
How To Make A Mid Ponytail
- To create this look, start at the front. If you have curtain bangs or face-framing pieces you want to keep out of the ponytail, secure them away for now.
- Gather the rest of your hair and brush it diagonally towards your ears and around to the back of your head. Once the hair is smooth and gathered together at mid-height (roughly in line with the top of your ears) secure it with a hair tie.
- Next, take a small section of hair, roughly an inch thick, from the ponytail. Wrap it around the hair tie to conceal it, then secure the ends. You can either tuck them back into the hair tie or use a bobby pin to do this.
- Lastly, use your preferred heat tool on a low-temperature setting to add a few loose curls to the ponytail. Let your curtain bangs/face-framing pieces down, and style as usual.
Want an optional added step to elevate this style? After securing your bangs, gently backcomb the front few inches of your hair at the front. This will add just a little height to your ponytail before you gather up the rest of the hair.
2) Messy Mid Ponytail

The mid ponytail’s effortlessly pretty cousin, this messy pony is our dream summer vacation look. All the benefits of the original style with an off-duty twist? We’re in.
How To Create A Messy Mid Ponytail
- We’ll keep this simple. Do everything you did for the style above, only this time, forget the hairbrush. Gather all the hair back with your fingertips instead, and don’t be afraid of lumps and bumps. We want to encourage them for this style! Pro tip: no-snag hairbands work particularly well for this style.
- Once your ponytail is secure and you’ve let down the loose pieces at the front, pull on either side of the hair tie to tighten your ponytail and lift upwards as you go. This will create height and a more laid-back finish for this look.
3) Low Bubble Ponytail

If you’re looking for a style that’s effortlessly chic and seriously easy to create (who isn’t?!), the bubble ponytail is for you. It’s perfect for work days, dinner dates, and everything in between.
How To Create A Low Bubble Ponytail
- First, decide if you want a sleek finish or something more laid-back. For a neat look, use a brush, otherwise, your fingertips will do just fine.
- Brush or gather all your hair into a low ponytail and secure it with a clear elastic. Brush the ponytail out for a tidier finish, otherwise, leave it be.
- Next, start tying off the ponytail in 2-3 inch sections working your way down toward the ends of your hair. Depending on the length of your locks you’ll probably need between four and six hair types.
- Finally, once all the bands are in place, loosely pull on each section between them to create a little volume, a ‘bubble’ if you will. Pull a few pieces, or your curtain bangs, loose at the front to frame your face.
An optional extra for this hairstyle? Use colorful hairbands, clips, or metallic hair wraps to cover the bands for a more elevated take.
4) Loose Curly Bun Updo
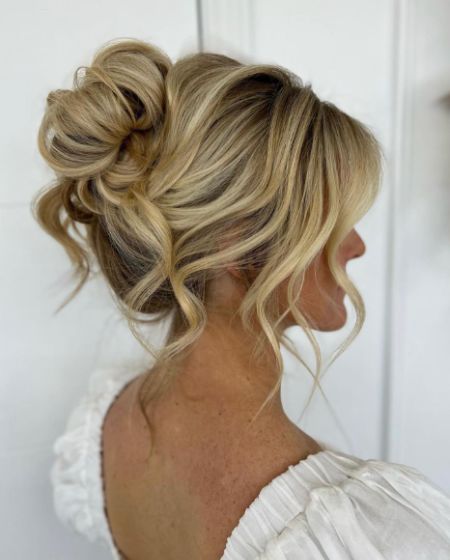
Whether you’re looking to upgrade your go-to messy bun on off-duty days or need an easy event hairstyle, this chic, loose curly bun updo is for you.
It might look super complicated but with our pro tips below, you’ll have your dream bun in minutes.
How To Create A Loose Curly Bun Updo
- For the curls, you have two choices. You can either curl all of the hair first, then create the updo, or, create the updo and curl only the loose piece afterward. The first may be more polished and put together, but the second looks almost identical and will save you heaps of time. If your hair is naturally curly, congrats! It’s a step you don’t even need to worry about.
- Now to create the bun. Loosely gather all of your hair toward the back of your head. Secure it in place with a hair band so you have a mid/high ponytail. Pro tip: using a scrunchie instead of a hair band will give you more volume – don’t worry your hair will cover it so it can’t be seen.
- Next, use your index finger to find the center of the ponytail inside the hairband. Tilt your hair forward and allow the ponytail to fan out in a circle on top of it. Use a second hairband to tie the fanned-out hair over/on top of the original hairband. Use your fingers to tease out the bun and give it more volume.
- With the loose ends of your hair, use bobby pins to secure the longer sections into and around the bun. If you didn’t curl your hair at the start, you can now use your curling wand to curl these sections. Pull out a few face-framing pieces/ your curtain bangs at the front for a salon-worthy finish.
5) Simple Low Bun

One of the chicest yet, honestly, easiest hairstyles on our list will last until you choose to take it out. It also takes two minutes to create and works seamlessly from day to night.
How To Do A Simple Low Bun
- Make sure your parting is straight, take a brush, and gather all of your hair into a neat low ponytail.
- Secure it with a hair tie, pick up your ponytail, and start twisting. As you twist, the hair will begin to move towards your head. Allow it to do that and start wrapping the hair around the hair tie to conceal it.
- If your hair is short enough, you can simply tuck in the ends and leave it there. If your hair is on the longer or thicker side, you may need a few booby pins to secure the bun and the ends firmly in place.
Pro tip: if you feel like the bun is moving around or falling too far away from your head, take a couple of pins, and secure the underside of the top part of the bun to the rest of your hair to hold it in place.
6) Claw Clip Bun

The best thing about claw clips? They help you create gorgeous hairstyles like this in seconds.
Sure you can follow one of the countless tutorials online for something super fancy, but we love the simplicity and ease of this classic claw clip look.
How To Create A Claw Clip Bun
- Collect all of your hair at the nape of your neck. You can use a brush, but we think this laid-back style works better without it.
- Twist all of the hair until it starts to form a bun, then wrap it around itself keeping the hair against the back of your head.
- Stop before you reach the ends of your hair then take your claw clip and secure them in place above the bun.
- Use your fingers to loosen and tease the bun for a softer, more lived-in look. And of course, don’t forget the shorter pieces pulled loose at the front to subtly frame your features.